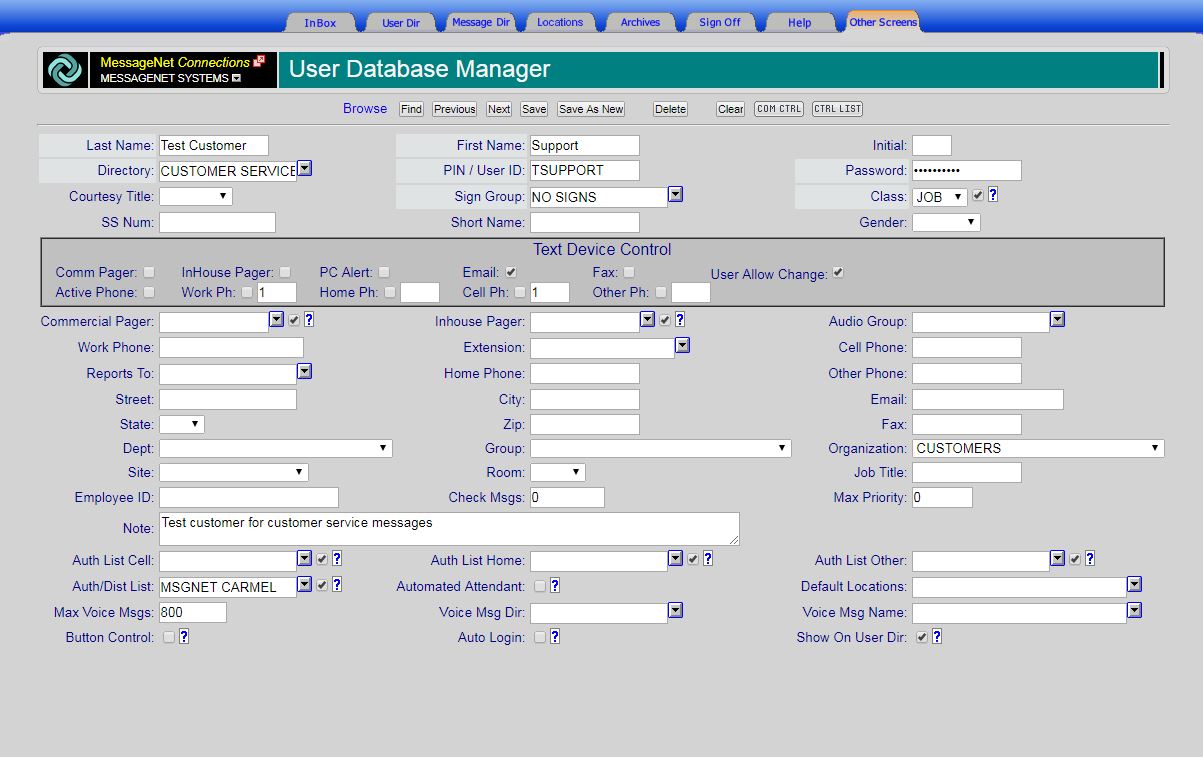
User Directory Navigation
- Browse: Click to browse a full list of all users
- Find: To find a user by name, clear out the last name or first name field, enter the appropriate name, then click find. If there are multiple users with that same first or last name, make sure the cursor is in the field that you used to search, then click Next.
- Previous: Click to navigate to the previous user record – the system sorts users alphabetically by either first or last name, depending on which field contains the cursor.
- Next: Click to navigate to the next user record.
- Save: Click to save changes to a user record.
- Save As New: Click to save a new user. Note that the PIN/User ID must be changed to create a new user record.
- Delete: Click to delete the user record.
- Clear: Click to clear out all fields.
- Com Ctrl: Click to navigate to the Comm Control screen. See How to Change Comm Control Preferences.
- Ctrl List: Click to navigate to the Sys User Database Access List to change which users have access to the User Database Manager.
- Check Boxes: Next to several fields, there is a check box – selecting this check box will allow the user the ability to change that field themselves.
- Question Mark: The question mark icon will display more information about the field it’s next to if you mouse over it.
User Directory by Field
The required fields to create a new user are: Last Name, First Name, Directory, PIN/User ID, Password, Sign Group, and Class.
- Last Name: This is the user’s last name.
- First Name: This is the user’s first name.
- Initial: Enter an initial if the user has the same name as another to differentiate.
- Directory: Select a Message Directory to be the user’s default directory. This will be the directory that automatically loads when the user clicks on the Message Dir tab.
- PIN/User ID: This is the user’s unique ID, which is used to log in to the MessageNet system.
- Password: Enter the user’s password, which will be used to log in to the MessageNet system. Note that if a user forgets their password, for security reasons, MessageNet Support staff cannot reset the password. That must be done by the on-site system administrator.
- Courtesy Title: Select the courtesy title for the user. This does affect the Gender field – if Ms. is selected here, Male cannot be selected for Gender.
- Sign Group: If the user has a sign or other public device that can be used to contact the user, select its sign group here. Because this is a required field, if the user has no sign group, select No Signs.
- Class: Select the user’s class. This determines what features and screens of the MessageNet system the user has access to. See below for a full list of user classes.
- SS Num: This is the user’s social security number. The MessageNet system does not use this field, so it is for informational purposes only.
- Short Name: Enter a short name for the user, if they have one. This is to help differentiate users of the same name.
- Gender: This field sets the gender of text-to-speech messages sent by this user. It is affected by the Courtesy Title field – for example, if a masculine title is selected, the Gender field will automatically change to Male.
- Text Device Control: See How to Set Up Text Device Control.
- Commercial Pager: Use the down arrow to select the user’s commercial pager, which is pre-defined in the Hardware Pager Database. This is the user’s primary text device and can be either a pager or a cell phone (See How to Define Text Devices).
- Inhouse Pager: If a user has multiple text devices, select the second one in this field.
- Audio Group: If the user has a sign or other public device with audio capabilities that can be used to contact that user, select its audio group here. This will allow other users to send audio messages for that user to this audio group.
- Work Phone: Enter the user’s work phone number.
- Extension: If the user has an extension, enter it here, with the main work number in the Work Phone field.
- Cell Phone: Enter the user’s cell phone number.
- Reports To: If the user reports to a superior, select that user here.
- Home Phone: Enter the user’s home phone number.
- Other Phone: If the user has an alternate phone number, enter it here.
- Street: Enter the user’s street address. This and all fields relating to the user’s address are fore informational purposes only and are not used by the Messagenet system.
- City: Enter the city in which the user lives.
- Email: Enter the user’s e-mail address. Note that this field is used for messaging, but that e-mail does need to be set up to work between the organization’s e-mail server and the MessageNet server.
- State: Enter the state in which the user lives.
- Zip: Enter the user’s zip code.
- Fax: Enter the user’s fax number. Note that this field is also only for informational purposes. The MessageNet system cannot send a fax.
- Dept: Select the user’s Department. This field can be used to logically sort users into lists.
- Group: Select the user’s Group. This field can be used to logically sort users into lists.
- Organization: Select the user’s Organization. This field can be used to logically sort users into lists.
- Site: Select the site at which the user works.
- Room: Select the room in which the user works.
- Job Title: Enter the user’s job title.
- Employee ID: Enter the user’s employee ID number.
- Check Msgs: Enter the length of time (in seconds) that will be the interval at which the Inbox refreshes automatically to check for new messages. A zero in this field will indicate never auto-refreshing, while any number smaller than 60 will be treated as 60.
- Max Priority: Enter the maximum priority the user can assign to a message.
- Note: enter any notes about this user here.
- Auth List Cell: Select a list to restrict who can view the user’s cell phone number on the User Directory screen.
- Auth List Home: Select a list to restrict who can view the user’s home phone number on the User Directory screen.
- Auth List Other: Select a list to restrict who can view the user’s other phone number on the User Directory screen.
- Auth/Dist List: This field has two functions. If the user is a LST or LSI user class, which should only be used for lists, this field will distribute any messages sent to the user to any users in the list selected in this field. If the user is any other user class, this field instead restricts who can see or message the user within the system to only those on the list.
- Automated Attendant: If MessageNet manages the phone system directly instead of interfacing it, click this check box to add this user and the extension listed above to the automated attendant.
- Default Locations: this field is used to specify a specific map as the default when the users accesses the Locations tab.
- Max Voice Msgs: Enter the maximum number of voice messages the user can have in their voice mail box at once.
- Voice Msg Dir: Select a message directory that will hold voice messages for the user. If none is selected, the default of SYSTEM.DEFAULT will be used.
- Voice Msg Name: Select the name of the message that will launch when the user receives a voice message. If no message name is selected, the default of VOICE MESSAGE will be used.
- Button Control: Check the box to allow the user the ability to change messages attached to a button associated with them.
- Auto Login: Check the box to allow auto login for this user. For security reasons, this is not recommended for any user that has multiple devices, uses any public devices, or shares devices with other users.
- Show on User Dir: Check the box to include the user on the User Directory. Without this box checked, the user will not be listed in the User Directory.
User Classes
Class defines a user’s access within the MessageNet system. The on-site system administrator should decide what duties each user should have and what features they’ll need access to before creating users. A full list of user classes and what features they have access to is available by clicking on the Help tab from the User Database Manager. There is also a chart of screens and the most common user classes and what those classes have access to. The most commonly used classes are MGR, LIB, CL1, CL4. JOB, LSI, and ROM.
- MGR: MGR stands for Manager and is the highest class of user and has access to all screens. Any on-site system administrators should be this level of user class.
- AMG: This is the assistant manager user class. It has the almost the same access as the MGR user class and is intended for high-level users who are not system administrators.
- LIB: This is the library-class user and is meant for creating Message Libraries for the Connections Mobile app.
- CL1: This is the highest class of standard user. This user class has access to the Message Editor for message creation.
- CL2: This standard class of user also has access to the Message Editor, but has access to fewer Other Screens.
- CL3: This standard class of user can launch messages, but not edit or create them.
- CL4: This is the lowest class of standard user.
- JOB: This is used to define a role or job within the organization that can then be forwarded to different users who hold that position at varying times.
- CST: This is the customer-class user and allows access only to the inbox and message directory screens and is only valid for a default of twenty days.
- GUC: This is the General User Class. It allows access only to the Send, Reply, User Directory, User Database Manager, Comm Control, and Stop Active Messages screens
- MUC: This is the Message User Class. It allows access only to the Send, Reply, User Directory, and Stop Active Messages screens.
- LST: This is a list-class user that is used to forward messages on to user lists. The LST user class sends one message to all of the users on the list so that if one person replies to it or closes it, it is closed for all other users as well.
- LSI: This is a list-class user that is used to forward messages on to user lists. The LSI user class sends each user on the list their own copy of the message so one user replying to or closing the message does not affect the other users’ copies of the message.
- ROM: This is a room-class user and is used to define rooms or locations so that messages can be sent to public devices with no user owning them from the User Directory.
- STU: This is a student-class user and is only allowed access to view their new and old messages.
- GRD: This is a guardian-class user that is associated with a student and is allowed access only to view old and new messages.
- TAP: This is a user class designed to define other computer systems as users so that the MessageNet system can receive input from the computer system’s TAP protocol via the modem connection. When the MessageNet server sees input from the TAP protocol it matches the TAP user’s PIN and then looks in the Directory field for the user’s default directory and then looks for a message that matches the input to launch.
- XPA: This is an Extend PA user class that has access only to the Locations and User Directory screens.
- LOC: This is a location-class user that has access only to the Locations screen.
- SGN: This is a sign-class user that can only send pre-defined messages from their own directory and to reply to messages.
- KSK: This is a kiosk-class user that can only send pre-defined messages from their own directory.
- PAG: This is a pager-class user that can only send pager messages from the User Directory. All other User Directory icons will not be visible.
- UDM: This is a User Database Manager class user that is only able to manage, create, and delete user accounts in the User Database Manager.
- ADM: This is the Administrative User class. It’s designed to be able to manage, create, and delete user accounts but cannot assign passwords to user accounts.
- SCR: This is the Security user class and can only assign passwords to user accounts or upload CSV files.
- DIR: This is the directory class user and is allowed access only to the User Directory.
Browse
If you click on the Browse button, this will take you to a new screen that is a list of all users saved in the MessageNet system in order alphabetically by User ID/PIN. You can navigate by filling in the Last Name, First Name, PIN/User ID, or Extension fields and then clicking Find. Click Next to navigate to the next user in order based on the field that was used with Find. The CSV button will allow you to create and export a CSV file. At the bottom of the screen are up and down arrows that will page up and down. Clicking on the number next to a user entry will take you to the User Database Manager entry for that user. To return to the User Database Manager, click Revert at the top of the screen.