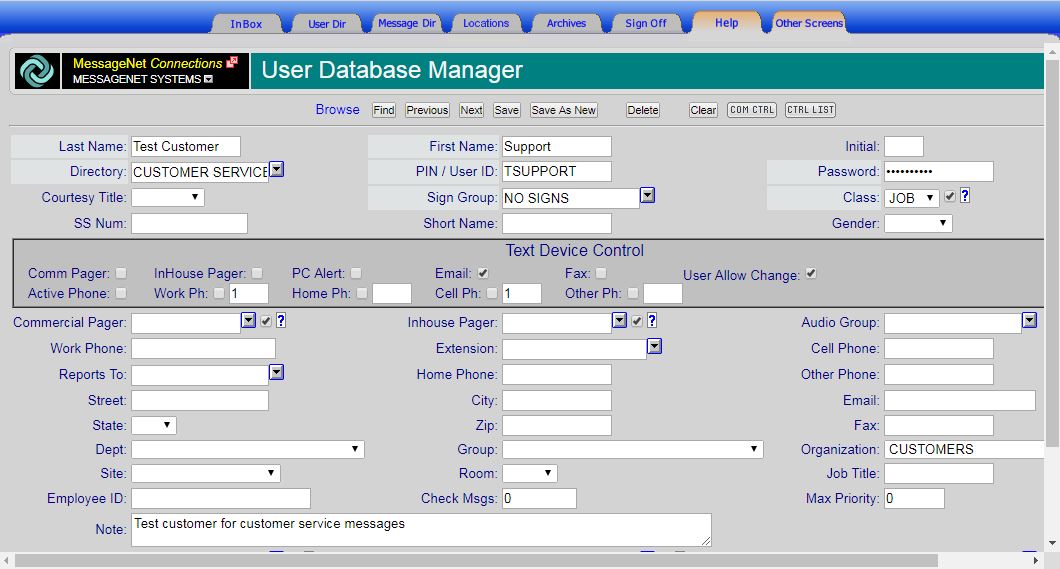
Creating and managing new users is the responsibility of the on-site System Administrator. For security reasons, MessageNet support staff cannot manage user accounts, as they have no way of knowing which users should have access to which features of the MessageNet system. Before creating a new user, the System Administrator should know what features of the system that user will need to use, so that the user account can be granted the appropriate permissions.
To create a new user, navigate to the User Database Manager from the Other Screens tab. Your own user record will appear as the default. The fields that are highlighted are the fields that are required to create a user account, but only the PIN/User ID field needs to be unique.

Erase the current contents of the Last Name, First Name, PIN/User ID, and Password fields and enter the correct information for the new user. Then, click Save as New. This will create a new entry (Save will override your own user account, so be careful). The PIN/User ID and Password fields will be used to log in to the MessageNet system and the First Name and Last Name fields will be used by messages and lists that the user will receive.
The other highlighted fields are Directory, Sign Group, and Class. In the Directory field, select the Message Directory that the user will be need most often. For some users, there is only one message directory that they use and they thus may not know how to navigate between directories. The directory selected here will be the default directory that appears when the users clicks on the Message Dir tab.
If the user has a sign that is dedicated to their use, then you can select the Sign Group for that sign so that other users can send messages to that user on their sign from the User Directory. Otherwise, this can be set to ‘No Signs’.
Class is the field that controls what kind of access and permissions a user will have to the MessageNet system. System Administrators will always need to be MGR-class users. Users who need to create messages will need to be at least CL1 (the highest level of standard user), while users who only need to send messages but not create them can be CL4 (the lowest level of standard user). To see a full list of possible user classes and what permissions they entail, click on the Help tab. Scroll down to the list of fields and select Class to quickly jump to the class descriptions. There will be a comprehensive description of each user class as well as a table of the different screens and which user classes have access to them.
Don’t forget to click Save after any further changes have been made.